Sprinter bike hauler.

The Adventure Mobile – Our DIY Sprinter Camper Van Bicycle Hauler

A glamour shot for the Sprinter before the JEM/Gould's ride near Zion.

This post covers the DIY buildout I did for our Mercedes Sprinter to turn it into a bike-hauling adventure mobile. The goal was simple: create a functional, comfortable travel rig…without spending half my life creating it. (I’d rather mountain bike.)

Our build took about three months of occasional effort, plus one big three-week push. The result is a physical manifestation of fun and freedom that fired us up for an amazing three-year trip, with many more months since. (Careful, van travel is addicting.)

The Sprinter van is what we use to carry two mountain bikes and two touring bikes, plus climbing and backpacking gear, on a variety of adventures. Hopefully it motivates you to get your own van or helps buildout ideas. Buen suerte!

Just Getting Started?

Thanks to remote work and COVID, van life is hot the hottest thing ever and the amount of online information regarding DIY van buildouts is crazy. When we started, I spent hours searching sites and forums or trolling Pinterest.

To help sift through build options and save time, I recommend picking up this Sprinter conversion ebook. It’s a comprehensive guide to DIY Sprinter vans and saved me a ton of time. The ideas and suggestions combine insights and featured buildouts.

Shortcuts to All Van Posts

For shortcuts to any van posts I’ve written, here you go! For details of our build, read on below this list. This post is a brain dump of many basics for our DIY van.

  1. Favorite van upgrades I did after a year road tripping.
  2. Tons of in-progress buildout photos in a gallery.
  3. Van features I’d keep (and change!) if I built out a new van.
  4. It was about time to upgrade our van batteries to lithium.
  5. A quick video tour of the gear garage.
  6. How to install solar panels or an Espar heater in your van.
  7. My custom-made doorstop, a favorite improvement.
  8. Downshifting from van life – #vanlife as a mindset, not a permanent travel mode!
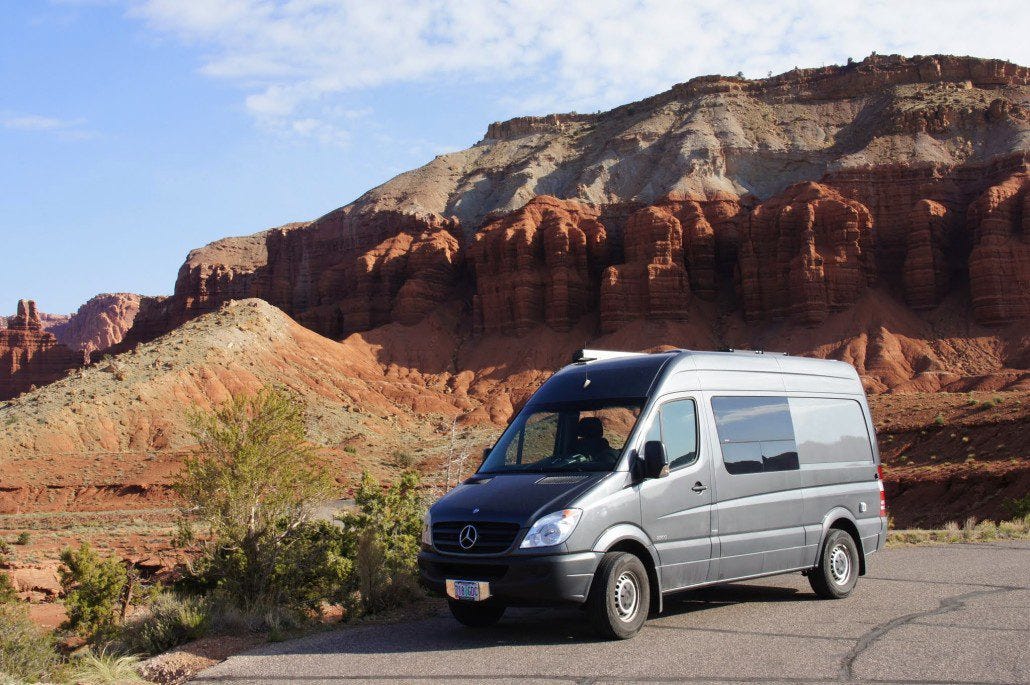
Shortcuts to Various Sections

This page is a comprehensive overview of our entire van build. If you’d like to jump to certain sections, click the links below! Otherwise, read on.

  1. Overview photos
  2. Buildout details
    1. Van size and model
    2. Bed design
    3. Pullout bike racks inside van
    4. Ventilation fan
    5. Batteries and inverter
    6. Solar panels
    7. Diesel heater
    8. Door stop for passenger slider
    9. ​Swivel seats
    10. Cooking
    11. Fridge
    12. Water system
    13. Cabinets
    14. Side windows
    15. Interior details
    16. Awning
    17. Curtains
    18. Lights
    19. Stereo system
    20. Lessons learned


Overview Photos

Sprinter van bike and gear garage. The drawers on the left/right pull out 4' and hold two road touring bikes and two mountain bikes. In the center is a big pullout storage drawer system on 3' slides for miscellaneous equipment for road tripping. The doors have pockets (Ikea!) that work great for organizing shoes.
Sprinter van bike and gear garage. The drawers on the left/right pull out 4′ and hold two road touring bikes and two mountain bikes. In the center is a big pullout storage drawer system on 3′ slides for miscellaneous equipment for road tripping. The doors have pockets (Ikea!) that work great for organizing shoes.
View in Sprinter van sitting in front swivel seat looking back. Ikea countertops on either side, utility drawer over fridge on drivers side, and storage with wire baskets underneath the countertops.
Bike repair stand and side table showing their utility after a MTB ride.

Buildout Details for Our Sprinter

I’ve got a few building skills acquired from working on houses with my dad growing up. That got me about 50% of what I needed to know to do this. The rest happened through over-confidence thanks to my (completely unrelated) engineering degree and extreme optimism, plus a dose of insanity.

Below are our main design criteria (and a lot of detail), plus links and info to help find specific parts and components. For our build, I ordered a huge amount of stuff from Amazon and many van supply companies continue to warehouse products there. Nothing like overnight shipping for free, right?!

By the way, dig these kinds of posts? Sign up for my free, 2x/month Traipsing About newsletter to level up your life around travel, creativity, and yup, van upgrades. After all, why bother building one out if it sits at home?!

Van size and model

We went with the 144″ high-roof model. The length allows us to park in almost any parking spot and navigate cities like San Francisco mid-week as well as remote fire “roads” without getting stuck.

The high-top is a must have because it allows a 6’2″ standing height inside. Sure, you can do a pop-top Vanagon/Sportsmobile style, but if you pop the top in a city then you’re going to be super obvious, and those things can get drafty. Oh, and if you don’t like working on cars or getting to know VW mechanics, Vanagons may not be your cup of tea.

The 4×4 model wasn’t out when we bought our van, but we would still stick with the 2wd model now. We drive lots of fire roads and solid tires like the all-terrain BFG T/A KO2s (245 series) take us everywhere I want to go. If people can drive through South America 2wd, we’ll be fine. Just my opinion, and of course the 4×4 looks badass!

Note: bigger is not always better. A few Sprinter-owning friends with the 170″ van mentioned they wish they had the shorter version. Ask yourself what your hobbies are, whether you need more space for kids, and what kind of gear you’ll be hauling.

Bed Design

This needed to be super comfortable so we could travel and not be desperate for a real mattress! If you’re traveling long-term in your van, screw sleeping on Thermarests and buy a bed better than your dorm room bunk. We sleep with our heads pointing toward the front on a queen-size latex mattress that I hacked a foot off of with a machete.

Note: No need for posts to support the bed! Just use plywood or wood slats attached at the walls and reinforce those with 6061 C-Channel structural aluminum from somewhere like MetalsDepot.com. To answer an FAQ, the base of our bed platform is mounted 39″ above the stock floor of the van. With dropper posts, I’d go with 36″ next time.

An older shot (prior to drop-down side table) from Big Sur.

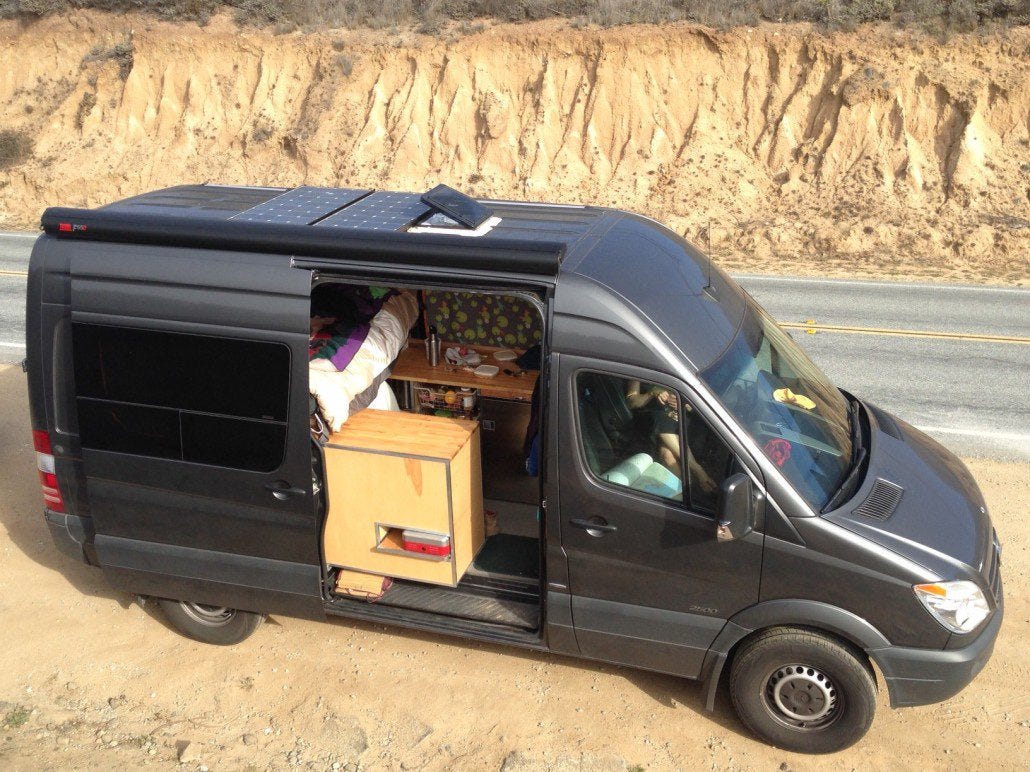
Bike racks inside the van

Hauling four bikes (two touring, two mountain) and protecting them from theft, weather and road grime was important for our initial travels. The heavy duty sliders are the 48″ heavy duty version, which are rated far stronger than we need (400 lb) but otherwise you can’t get a 4′ slider (and if you use that drawer for gear, you don’t want a wimpy 200 lb rating anyway!). Yeah, they’re expensive…and I wouldn’t have it any other way!

If you only need ~3′ pull-outs, the 200 lb version has worked well for our center drawer. I used 3/4″ maple plywood to build them and lined the bottom with a clear plastic floor mat to protect the wood, with fork mounts from Universal Cycles. They work great.

Note: I’ve had a few questions about the tray size. The road bike trays are 60″x 13″ x 3″ (outside dimensions) and the mountain bike trays are 60″ x 17″ x 3″.

Ventilation fan

Keep the van cool and aired out with a roof fan. Ours is right behind the front seats and keeps things nice and cool with the side windows cracked.

Why didn’t we do A/C? Because we are scared of RV parks and A/C pulls WAY too much electricity…and I refuse to have a generator in my van. Let the 40′ RV’s do that lameness. We own camper vans, not portable homes! If we can survive a night in Death Valley where it was 100 degrees after sunset, we’ll be fine anywhere.

(Model: Fantastic Vent 6600R rain sensing version. The variable-speed fan in the 6600 is a great feature.)

200W of solar power and the vent fan.

Battery and electrical system with a 2000W inverter

We charge laptops and phones, plus run a fridge. For A/C needs, we have a Ninja blender and a hot water boiler. If you don’t have a dedicated 12V USB charging, these outlets are rad. They charge two USB devices and have two A/C grounded plugs as well.

Note: I highly recommend splitting the van alternator and battery circuit like this so that they are charged while you drive. (Update 2021: lithium batteries need a DC-DC charger like this.) This keeps things topped off even if it’s cloudy or rainy. We also have shore power, which we rarely use.

Update February 2021: I recently swapped out our old-and-toasted AGM batteries for two mega-powerful Ohmmu batteries. These babies pack 300 amp-hours into the same space, weigh half as much, and have a lower life-cycle cost than AGMs. Ohmmu makes Tesla batteries and cranks out about 1.5x the capacity of Battleborn or other mainstream batteries (for the same price!). Here’s the full writeup of my DIY upgrade.

(Models: Inverter – Xantrex PROWatt SW2000 plus the remote switch. Old batteries – Full River DC224-6 with 224Ah. New batteries – Ohmmu Group 31 with 300Ah)

Solar panels

Here’s the full write-up I did on our install, a 12v DC system fed by two 100W panels. Since I installed ours, prices on kits dropped dramatically and now I wouldn’t go with AM Solar. Renogy is SO cost-effective; here’s their 200W setup, enough for most vans.

(Model: Grape Solar 2 x 100w with full system – GS 100 – from AM Solar in Oregon.)

Diesel Heater

Espar D2 diesel-fueled heater that runs off the main vehicle tank (see full description of installation to save some headaches). No propane tanks or extra fuel to carry around, and fewer things to break.

Update November 2020: After eight years of using ours, we’ve had zero issues with it. If you camp consistently at 8,000+ feet, get the high altitude kit. It’s built into many units these days.

(Model: Espar D2 Airtronic via a screaming deal on Ebay.)

Passenger slider intermediate door stop

This is an addition we did in San Diego to stop the door from sliding all the way open every time we opened the passenger sliding door. If you didn’t order it as a stock add, there’s an expensive kit that Mercedes offers (PFFFFFT). We absolutely love this and I bet you will too. Rather than a long description, read more here if you’re interested in the solution I came up with my brother-in-law. He has sold dozens of these to satisfied customers and people are even writing testimonials about them.

26 degrees in the Alvord Desert? No worries with a heater!

Swivel seats for the driver and passenger

180-degree rotation to convert the cab into seating and my desk. Note that this raises the seat height a couple inches.

(Model: Purchased from Sprinter Store in Tualatin, Oregon)

Cooking

Originally, we went with a portable propane stove that practically everyone I know owns. With updated batteries (LITHIIIIUM, BABY), now we have a mini-microwave and an Instantpot to handle cooking.

Fridge

As big as possible so we can bring plenty of grub for extended stays away from civilization. 12V DC, and far more efficient than a typical dorm fridge. It pulls about 2.5 amps running at full blast (though they spec 5 amps for startup amp pull), which means we have four days of battery life if it ran all the time. Adding an efficiency increaser I added as an upgrade cut energy usage by 50%

Gotta say, this is one of our favorite things in the van, and I can’t even remember the days of coolers and ice. Popsicles after a bike ride in the desert=living large! Do yourself a favor and get a fridge… I will say that the workmanship on the Isotherm CR-130 fridge isn’t amazing and we’ve had similar issues to what this writeup says.

(Model: 4.6 CF stainless steel Isotherm CR-130 purchased from West Marine.)

Water system

After 2.5 years of just water in jugs, I installed a Dometic sink, a cheap 12v electric pump (basically any will do), and 25 gallon water tank in the van. Check out the first item in this van upgrades post for some pics and links to what we used if you’re interested. Glass jugs of water (to avoid chemicals leaching into our water) are still our go-to for drinking water.

The sink cranking out running water!

Cabinets

Friends have sacrificed their relationships and well-being to create complicated cabinets. It’s not necessary!

Ours are maple and birch plywood attached to the floor with L-brackets with $10 wire baskets from Ikea that are tough and light for the majority of drawers to keep weight down. There are also a few slide out drawers to hold appliances (hot water boiler and blender) and the four water jugs. This has worked great. Birch countertops to top things off – thanks again Ikea!

Side windows

Mercedes doesn’t provide stock side-panel windows that open. We went with a window that many Sprinter converters use, the CR Lawrence tilt-outs, and they’ve been great.

With the aforementioned vent fan, it’s fantastic to be able to open the windows (which are screened) and have airflow through the van without 1,237 blood-sucking mosquitoes joining in.

Note: I had these professionally installed by Van Specialties near Portland because cutting a couple giant holes in my brand-new van made me want to puke.

Enjoying breakfast with a view in the Utah desert

Interior

Sound deadening to mitigate road noise, plus insulation (open-faced denim insulation for walls and denim water-heater blanket from Amazon for ceiling), plus a thin, light-colored wood veneer so we feel like we’re on a boat. (There is also the ready-made RB Components interior or a less expensive one from Van Specialties.)

In the buildout pictures gallery, you can see some details of my interior build. I used silver pan-head, self-tapping screws that were ~1.25″ long. For the wall panels, I just screwed directly into the metal frame of the van. For the ceiling, I ran five strips of plywood first (see pictures gallery) to make mounting/finagling the ceiling panels into place easier.

Note: I played around with Rivnuts and decided they were HUGE overkill for attaching 1/8″ plywood. Save yourself 57 hours and skip them. I did use Rivnuts to mount the bed to the wall.

Awning

Double our living space off the side of the van. Easy to crank out to the side, no whistling from wind while driving or noticeable reduction in mileage, and installation was *cough* a breeze solo on a tippy ladder. (Recruit a friend!) The awning isn’t good in strong wind, but keeps the rain off and certainly the sun when wind gusts stay under about 20 mph. Given how little we use it, I might not buy one again.

(Model: Fiamma F65s, perfect for the 144″ Sprinter. Purchased from the Sprinter Store.)

The Sprinter in action in the Mojave National Preserve. Awning and stove out while cooking a meal and enjoying the view.

Curtains

Occasionally (ok, frequently), we pull into cities along the way and sleep in a quiet neighborhood. Yeah, we could get a hotel, but I paid enough for the damn van and I want the cost-per-use to keep dropping. Blackout curtains make this possible.

Ours are a two-layer black canvas facing out and a colorful design with  snaps and magnets that keep it quick, clean and easy. These were the first time I’d ever used a sewing machine and turned out quite well. For the front windshield and passenger/driver windows, we went with a cab insulator kit, also from the Sprinter Store. Using these, we’ve stealth camped at least 100 nights in cities and never had anyone bother us.

Lights

12V LED lights that we installed two months into the trip in Santa Cruz. A MUST have, in retrospect. We have one diffuse (wide-spread) light a foot back from the headliner and another two spotlights over the countertops. Having fairy lights or mood lighting is a great addition as well.

Get the lowest temperature (warmer light) model that you can. Around 3,000 Kelvin seems to be what people like the most.

Note: I retrofitted our lights with photo filter paper from B&H and now we have a warm orange glow. I also installed a 12v LED light bar in the gear garage – both written about in this upgrade post.

Stereo system

Last but certainly not least, the High School Dream System that I couldn’t afford when I was 18. I suspect we bump Macklemore more than most teenagers in Seattle.

For those putting in a subwoofer, ours is in a custom-built box in the space under the passenger seat down-firing toward the floor. Works great!

Note: with the most-excellent Alpine deck we installed, I can connect via Bluetooth from my laptop and watch movies with some serious bass and surround sound action. It’s fantastic!

(Models: Alpine Bluetooth deck, 4 Hertz 6.5″ mid/high speakers, ID 10″ subwoofer, Helix 5 channel amp.)

Sprinter bike hauler
Bike racks in action in Andrew Molera State Park in Big Sur.

Things I Learned Doing Our Buildout

Turns out building out a Sprinter is like building a house. Same decisions on finishes, same design dilemmas. Which isn’t my favorite thing, by a long shot.

The saving grace? That this “house” had an engine and could give us access to nature and new places. That said, there were absolutely moments that I wanted to (and did) scream in frustration on a sunny Saturday when I was insulating it instead of shredding perfect mountain biking trails. Patience – the shredding happened later, and lots of it.

  1. Drilling holes in a new Mercedes gets progressively easier as you make more of them.
  2. Nothing in the entire vehicle is straight. Curved walls, floors, windows.
  3. A full shop would have made this far easier. Almost everything was done on two sawhorses in our backyard with a circular or jig saw and an abacus for calculations.
  4. DIY=prototype. Sometimes a permanent one, but in my mind, it was always “Wow, learned a good lesson there! I’ll take advantage of that newly-earned skill next time I (insert incredibly frustrating, tweaky building activity).”
  5. I could have been a contortionist given the small, awkward spaces I was able to cram myself into while building the interior.
  6. Put the heater in the van BEFORE you go to Idaho in the winter to shiver in 20 degree weather and slither around on the frozen ground underneath the van routing fuel and electrical lines.
  7. The process of building an adventure rig is immensely satisfying. I look at the completed Sprinter these days like a proud parent at graduation and am stoked (and surprised) that it turned out so well. Also, perhaps not like a parent (you tell me!), I pretend I don’t see the little things I’d like to improve. In my day job there ain’t much in the way of a finished, physical product, and so it was really rewarding to see something concrete come together.

Enough words. Time to start building your van!

If you read this entire post, plus comments, and can’t figure something out, drop me a line. Maybe I can save you 12 hours of pain or at least throw a snide comment your way about how suffering builds character.

Happy van building!

Whoa, you read this entire post?! If you survived (or even enjoyed?) all the bad jokes, you’ll probably enjoy my free 2x/month Traipsing About newsletter.

The van taking in a view of the Alvord Desert.
Once your buildout is done, you get to hit the road to places like this!
210 replies
  1. Aaron
    Aaron says:

    I never said you were stinky hippies, I said you were DIRTY STINKING HIPPIES! Hope your travels are safe and fun. I’ll be keeping track of You and judging your writing 🙂 it’s going good. I spent Black Friday replacing universal joints on my truck and can you believe NAPA didn’t have my parts on sale?!

    Reply
    • Dakota
      Dakota says:

      Ah, missed the dirty. I’ll get it next time! And maybe you should have installed a flat screen TV in your truck instead if you wanted a bargain? 🙂

      Reply
    • Dakota
      Dakota says:

      The hard part is pulling time out of your house to free up the space to make one! Enjoy the new home for at least a few months and then bring it up with your wife!

      Reply
    • Dakota
      Dakota says:

      Thanks Dan! So far, so good!

      I also just added interior LED lights, a muffler for the heater and another sliding drawer in the bike garage to help organize things. Lights are key. Last item is a sink and water reservoir and then we’re dialed.

      Reply
  2. Christi Hildebran
    Christi Hildebran says:

    Greetings fellow Oregonians! We love your blog. We recently purchased our Sprinter this past year and are in the process of converting it. We hope to hit the open road, with motorcycles in tow, sometime in the near future. We started a blog as well – it needs a lot of work (content, video and text added soon) – but we wanted to document our Sprinter conversion and our motorcycle travels. We have found a very similar, human experience in traveling, especially with motorcycling… most folks we meet are kind, generous and truly interesting. It has restored our faith in humanity for sure.

    A few questions about your conversion:
    – what material did you use for insulation?
    – was the RAAMmat easy to install? we’ve read a few things about the difference between RAAMmat and Dynamat and wanted to know your experience.
    – you mentioned that in retrospect you would have gone with the rain sensing version of the fantastic vent. what is the significant difference between the two in your opinion?
    Best to you both. Happy Travels,
    Christi & Chris Hildebran
    Portland, Oregon
    http://www.wendourway.com

    Reply
    • Dakota Gale
      Dakota Gale says:

      Hey Christi and Chris! Welcome to Sprinter land. It’s a good place to be.

      Answers to your questions below. I’ll update this in my post too, thanks for the clarifications:
      1. I used denim insulation. A combination of faced stuff (ceiling) from Amazon (I can send you the link) and then open-faced from Green Depot in PDX, though you can buy it anywhere.
      2. I’ve never installed Dynamat or RAAMmat. I was in a rush and wound up paying an audio shop to install it. Took them a few days with two guys on it. I would use less RAAMmat next time and just put it on the big panels, though the cost at 1/4 of Dynamat is great. My brother-in-law ran an audio company and thinks the two of them are basically the same material and uses RAAMmat for his projects.
      3. Biggest difference is that it will close/shut down when it starts to rain, and that you get a variable speed fan (instead of just three speeds). When you have the fan running at night and it starts to rain, it’s nice to know it will just shut down and you don’t have to get out of bed. Not a big deal, but for $80-$100, why not? We spent enough on the vans already, right? 🙂

      Let me know if you have any other questions! Feel free to shoot me an email.

      Dakota

      Reply
      • Logan
        Logan says:

        Great build and informative site.

        After living in your van are there major things you’d do differently, is your floor plan working well?

        Two work surfaces are unique has that proved to be beneficial (additional storage below the driver?) Would you rather have one counter and an alternate place to sit (than the van seats)?

        Compared to others you seem to have more space to stretch out between the (pivoted) cab seats and the fronts of the galley cabinets. Is this working well or do you tire of using the same seats driving and living in? Again, great informative site, thanks

        Reply
        • Dakota
          Dakota says:

          Hey Logan,

          Glad the post was helpful for you!

          For us, the floorplan works great. I felt the slider door space was a waste of potential floor space and love the peninsula blocking most of that space. It wasn’t so much about workspace as storage.

          There is not a huge amount of space between the front seats and cabinets – it’s about 2.5 feet. I don’t mind sitting in the van seats (though they aren’t the most comfortable…I will say I’m considering getting more plush seats). We also sit on the counters or in external chairs a fair amount.

          When it came down to it, the bikes, a comfortable bed, and plenty of storage was the focus. For our needs, it has worked well, and others have copied our build and liked it as well. Whether it works for you is of course dependent on what you plan to do with your rig.

          Happy building! Drop me a line anytime.

          Reply
  3. Chris & Erin
    Chris & Erin says:

    Hi Guys, I love your blog. We just got our sprinter and are starting to plan in earnest.

    I was curious what you used for cooking?

    I noticed you went with the Espar to heat and was just curious if you did anything similar for cooking?

    Did you do anything for A/C ?

    Thanks!

    Chris
    http://www.zephyrsunrise.com

    Reply
    • Dakota Gale
      Dakota Gale says:

      Hey Chris and Erin,

      We have a simple propane stove that pulls out on a sliding tray out of the passenger sliding door. It’s the red/silver thing in the cabinet that you can see in the pictures. We cook outside all the time anyway and didn’t want to deal with smells inside. With the ceiling fan, we could if we absolutely needed to though.

      The Espar is just for heat. I researched the Espar cooktop/heater combos and just wasn’t impressed. We are not big fans of electric heat and I didn’t want to pay the big dollars for the diesel cooktop. Cool technology though.

      No A/C, just the fan. We don’t plan on being in areas where it’s super hot at night, and during the day we’re out and about or can pop the awning out and enjoy the breeze. So far, so good!

      Drop me a line with any other questions and congrats on your Sprinter!

      Dakota

      Reply
      • Chris
        Chris says:

        Good info. I was kind of thinking the same thing re: the cooktop. Not that impressive, and you can buy the cadillac of propane stoves for the price of the cooktop. It’s a really slick way to go, but budget is an issue. I spoke with a guy that makes an espar aftermarket air heat/water heat/engine heat combo unit but he charges $4,000 for the combo of the heat transfer unit. So far I haven’t had any challenges starting the sprinter, but maybe in subzero it’s an issue.

        Thanks again!

        Reply
        • Dakota Gale
          Dakota Gale says:

          FWIW, our van has started with NO problems at all down to 20 degrees. I suspect the $4k for the aftermarket kit doesn’t even include the installation. Who wants to travel somewhere that cold anyway? That’s why we BUY these vans, right? (At risk of offending all the snow sporties in the crowd!)

          We could have done the interior stove, but budget wasn’t the deal killer. We didn’t want to lose the counter top space and cooking in such a small space makes all your stuff smell like whatever you’re cooking. If you’re in a city and can’t cook outside, eat out. 🙂

          Reply
  4. Chris Adams
    Chris Adams says:

    Hi Dakota, I’m sitting in our van taping out a rough sketch of our first floor plan idea. Any chance you have a sketch of your floor plan I could take a look at for ideas and inspiration?

    Thx.

    Reply
  5. Marc
    Marc says:

    I had to go back to this blog to see the picture of the 4 bikes….I missed that the first time around and didn’t realize you had two bikes on each slider. Sweet!

    Reply
    • Dakota Gale
      Dakota Gale says:

      Yeah man, gotta have both options! It has been great for around town/national parks with road and mountain bikes for the rest of it. Definitely a MTB-focused trip though.

      Reply
      • Eric
        Eric says:

        what size bikes do you have? I am thinking of building a slider for mine and not sure if my XL bike will fit on the 60 inch slider.

        Reply
        • Dakota
          Dakota says:

          I ride a large. You’ll need to extend the slider or move the fork mount veryyyyy close to the rear doors for it to fit. Mock it up before building it and you’ll figure it out!

          Reply
          • MICHAEL ROUDABUSH
            MICHAEL ROUDABUSH says:

            Looks like you used the orginal floor. How did you secure the sliders on the floor. Any issues over time?

          • Dakota
            Dakota says:

            Correct, I used the original floor and installed some screw-in metal mounts that allowed me to bolt the sliders to the floor. It’s worked great! If you flip through the install pics, there are a couple photos of how I did it.

  6. Pierre-Luc Parent
    Pierre-Luc Parent says:

    Hello guys, I love your set-up. Last october I buy a sprinter too and I love it. I use it a bit like you, it my home away from home. I work for a Circus and always on tour. the nice thing it I can fit all my toys in it. Got a question for you, where did you got your custom 2 stage sliding door opener?

    Reply
  7. Caitlin and Tad
    Caitlin and Tad says:

    Hey Guys—Super inspirational site as my husband and I are building out our van as well. Question: how did you attach the window curtain-things? Magnets or? Also, what’s your mattress covered with, if anything? Does it fold up or roll up? Thanks

    Reply
    • Dakota Gale
      Dakota Gale says:

      Hey team! Good questions…I keep meaning to write a post about curtains buuuut just can’t bring myself to care. 🙂

      We had two different styles of attaching the curtains. For the side windows, I found some snaps that you can screw into the frame of the window. Then we used something like this (http://bit.ly/1nFQ8oy) and attached them to the curtains.

      For the rear windows, we used neodymium magnets that you can get at any ACE Hardware store. They are attached with iron-on fabric and have worked extremely well.

      The bed is simply a nice latex mattress that we took from our guest room at home and chopped a foot off with a machete and kitchen knife. 🙂 Nothing on top and it doesn’t roll up. In fact, it about killed us trying to get the heavy-as-heck thing into the van. Certainly not light, but we wanted a comfortable bed since we planned to spend so much time in the van (and did end up doing so).

      Hope that helps!

      Reply
  8. JD
    JD says:

    We start our conversion in less than a month with most things dialed in but pulling my hair out about insulation! Got a 170 with the d4 and looking at spray foam and a million others as well. Just came back and read u used the denim. Any insight on how it’s performing or how the install went?

    Reply
    • Dakota Gale
      Dakota Gale says:

      Hey JD,

      I did the same thing! So many choices.

      When it came down to it, the toxins in the spray foam were a large enough factor that we decided not to go that route. Same with fiberglass insulation – I hate that stuff.

      The denim has worked well for us. It was easy to install too. I just stuffed it into cavities on the smaller wall compartments and used aluminum tape to hold it in place for the ceiling and large wall panels.

      With the 1/8″ wood interior paneling over it, we definitely noticed a difference in both sound and heat transfer. It still gets hot/cold in there, but R7-R11 is a big improvement!

      Good luck with the overhaul. The nice thing is that the install is over in a day or so once you get the setup and hard decisions out of the way. Cheers.

      Reply
  9. JD
    JD says:

    Thanks for the info on the denim insulation. Noticed you ran thin wood strips across the ceiling before putting up paneling….what about walls? Strips or just screwed panel to metal. Was wondering if just screwing panel to metal if paneling would look wavy.

    Reply
    • Dakota
      Dakota says:

      Sure thing JD. Glad it was helpful.

      Wood strips on the ceiling (3/8″ plywood) were necessary so I could run seams perpendicular to the van and use fewer pieces/have fewer seams. Not at all needed for the wall – it doesn’t look wavy with 1/8″ interior paneling. I used panhead SS screws directly into the metal (don’t bother with rivnuts) and it worked great!

      I really need to write a blog post about the interior paneling. I’ve had a ton of emails about it.

      Reply
  10. Camber
    Camber says:

    Question about a whole different aspect of Sprinter Vans and living in them… what did you manager to do or find for RV insurance, what with it being a DIY camper? Running into a lot of issues trying to find a company to insure ours! Any ideas?

    Reply
    • Dakota
      Dakota says:

      Ah, good question! A bit of a pain.

      We went through Safeco and an insurance agent I’ve worked with for years, but options were slim. Most online sites like Geico won’t cover it, in my experience at least. Ours is just an RV policy and I chose the coverage amount. If you get a renter’s policy, you can cover the contents as well. Disclaimer: we haven’t had to make any claims, so who knows if it will ACTUALLY work. My agent assures me it will. I hope to never try it out.

      If you cover it as a vehicle (car/truck), you’ll pay more because the insurance company assumes you’ll drive it more often. Even if you don’t have a bathroom/running water and it’s not officially an RV, it seems you can cover it as a car or an RV. Hope that helps a bit!

      Reply
  11. JD
    JD says:

    Installing my d4, went big and prob don’t need it, does your d2 espar not have a fuel meter to go between tank attachment (“08 and newer) and the heater? Mine states the fuel meter is the most important part of the system??? Even comes with a bracket to make sure it’s mounted at a certain degree range.

    Reply
  12. JD
    JD says:

    Installing my d4, went big and prob don’t need it, does your d2 espar not have a fuel meter to go between tank attachment (“08 and newer) and the heater? Mine states the fuel meter is the most important part of the system??? Even comes with a bracket to make sure it’s mounted at a certain degree range.

    Reply
    • Dakota
      Dakota says:

      No fuel meter on mine. Seems like the degree range is totally inconsequential if you park on slopes of even a few degrees, which we did frequently (we never level our Sprinter for parking).

      I’m sure you read my post on the Espar install, but everything I read from Espar and what seemed like trustworthy sources indicated that I didn’t need to go that big for a 140″ model. Sounds like they recommend running the heater at full boost mode to keep the combustion chamber from fouling. I bet they overstate the necessity for that though and I bet yours will work great.

      Reply
  13. Jamie
    Jamie says:

    Really nice work man. Is. Does the heater work well enough for ski trips. My wife does not like to be cold. Can’t wait for sprinters 4×4 version in the US. Thanks for the post.

    Reply
    • Dakota
      Dakota says:

      Thanks Jamie. Appreciate it!

      My wife HATES the cold. Less than 40, and she’s a ball curled up under a down comforter. The coldest weather we’ve experienced was 22 and the heater kept things warm enough inside that we were comfortable. Heck, it didn’t even run all night.

      Yeah, the 4×4 would be sick (it’s already out), especially if you love to ski. Drop me a line anytime with questions about your van.

      Reply
  14. Kay
    Kay says:

    Hello! Thank you for providing us with such great information! Question: did you consider the espar hydronic as opposed to the airtronic? Let me know your thoughts on that. If you’re ever near Boulder, CO, please get in touch, have a hot shower, throw in some laundry, and we’ll take you for a bike ride 🙂

    Kay and Dean Levesque

    Reply
  15. Dakota
    Dakota says:

    Hi there! Glad the write up helped.

    We definitely considered the hydronic. Two things stopped us: cost and the amount of work to install it. For us, it didn’t seem worth it for how we use our van. Sounds like a good system if it comes pre-installed or you feel the cash is worth it. Our inverter plus a hot water boiler has worked great!

    Count us in on bike ride next time we’re in Boulder. Not sure when that will be, but we’ll drop you a line next time we visit. We love that part of of the country.

    Drop me a line anytime with questions about your build. Happy to help.

    Reply
  16. Andrew Murray
    Andrew Murray says:

    Great design and build….the bed over bike configuration is exactly what I’ve been imagining for my pending project. Like your’s our rig will also need to carry a pair of MTB’s and a pair of Salsa Vaya touring bikes. The E-spar makes total sense, and I’m with you on portable stove vs built in.

    I’ve got a question about the bed…the picture of the two of you looks like the platform is pretty thin and needing additional reinforcement. Did you do anything additional to support the cross wise span? Also, kind of curious, without being to personal, on how you manage toileting?

    If you come through Santa Cruz again we’d be happy to show you some great mtb and or mixed terrain rides. We live a mile from Wilder Ranch.

    Reply
    • Dakota
      Dakota says:

      Hey Andrew,

      Good question! I reinforced the 3/4″ plywood bed with u-channel aluminum. It flexes slightly, but works great, even with a heavy mattress on there.

      Good question on the toilet. Pee jug plus outside toilet for #2 works great for us – we’ve never had an emergency. I really didn’t want a nasty toilet inside the van and even 8 months cruising in it didn’t change my opinion on needing the convenience.

      Santa Cruz trails are SO great. May be down there soon, actually, and will definitely drop you a line. We spent 3 weeks there last December on our way south in CA and it was so great. Would love to take you up on getting a tour – Wilder and UCSC were so damn fun!

      Til then, good luck with the build out! Drop me a line anytime with questions.

      Reply
  17. Pat Matson
    Pat Matson says:

    Hi Dakota, we talked Monday at the bike shop, for a while starting w/Handlebar bag morphing into paniers & the center of Sprinter universe, Hood River (or so it seems.at times)

    Really enjoyed talking to you, which leads me to the Van ?’s:
    How did you break down the cost of buying new vs used?

    Did you get an extended warranty?
    What would you do different in purchasing?

    So, thoughts on the decision on both the 140(?) wheelbase vs bigger?

    Seems like I saw that you bought a base model is that true?

    Was the black paint job due to graffiti or?

    Curious as to the practicability of 2 things: the pull out camping stove, one has to be outside to use it yes? & does necessitate a lot of in & out of the van? OR is it not a problem as you two are so organized?

    & the water sink washing system, I’ll have to study some more as I’ve not found the details that I’m sure you put in there.

    I see that there is no B/R system, true? So you rely on the great outdoors & convenience stores for potty breaks?
    Thanks for taking the time & sorry if these ?’s have already been answered.

    Stay safe & as always

    Keep the Rubber Side Down & the Sunnier Side UP!
    Pat

    PS
    Let me know if you guys are headed out this way either for an adventure or a beverage OR both

    Reply
    • Dakota
      Dakota says:

      Hey Pat,

      Nice talking to you as well!

      Van questions:
      1. New vs used – we started out looking at used vans, but couldn’t find any without either tons of miles or configurations totally different than what I was looking for. To be fair, I also was in a bit of a hurry (I only had a search going for a few months) because we were planning to leave on a trip.
      2. I didn’t get an extended warranty. My approach was to get the Costco price for a van through Eric at Mercedes-Benz in Eugene. Worked great and I feel I got a good deal. If I ordered a new van, I’d probably spec out a few things like a backup camera and the upgraded steering wheel package, plus maybe fog lights, but that stuff adds up.
      3. I love the 144″ wheelbase. The 170″ is just too big for me. As often as we’re in and out of cities, and given the congested area that we live in, it was an easy decision. I also think the 170″ is less amenable to driving in nasty terrain. Since we’re never, not once, stayed in an RV park, the ability to get at least a bit off road was important for us.
      4. Base model, yep. It was a simple cargo van option.
      5. Paint job is stock – it’s the metallic gray or something like that.
      6. Pullout stove has worked fine for us. We didn’t want fumes inside the van, and we can always pop the awning out and cook outside. We’ve also cooked inside with the vent fan running (only a couple times) and that was fine too. Cooking outside didn’t necessitate a lot of in and out because we can just grab stuff right off the counter. But yes, we are quite organized!
      7. Water system is basically jugs of water. I’ve considered, quite in depth, putting a full water system in, but haven’t pulled the trigger on it. We simply use a wash basin for dishes and Helio pressurized water shower to do them. Works great. That said, the convenience of a sink is pretty great…
      8. No bathroom system. For such a small space, the idea of a BR grosses us out. We’ve never had an issue. A pee jug works just fine, and we’re always out in nature or in a city where things are convenient enough. The last thing I wanted to do was deal with cleaning out a nasty portable toilet.

      Let me know if I can help with anything else! I’d say this: a water system and a toilet will probably be nice for you if you’re planning to live in the RV long-term and bring along a happy, yeah-let’s-keep-road-tripping wife. Because it’s more fun to travel with someone else!

      Ciao for now.

      Reply
  18. Neil Nikirk
    Neil Nikirk says:

    Dakota, great blog and thanks for the HUGE amount of information on the build. We will be embarking on a similar build sometime soon, only ours will carry rafting equipment under the bed, rather than bikes. I see no mention of a propane system, so assume you use the disposable cannisters for the camp stove. How has that worked out long-term? Any addition of a water system at this time? I would love to see a post on the cabinet construction, they look great! Thanks!

    Reply
    • Dakota
      Dakota says:

      Glad to be of service, Neil!

      We just use disposable canisters. We frankly don’t cook much, lots of fresh salads and easy meals, or boiling water using hot water boiler for breakfast oatmeal. It would be easy to design a spot for a bigger tank of propane if you thought you’d be using a lot.

      Still the same water supply. Haven’t been around the van enough to think of anything else – just got back from parking it for 7 months while we traveled on bikes and then just backpacking.

      Cabinet construction was pretty simple, really. Just maple plywood attached to the ground with l-brackets. Ikea baskets for drawers. Turned out great!

      Are you building out a 170″? Seems like rafts would fill up a 144″ preeeeetty darn fast.

      Reply
      • Neil Nikirk
        Neil Nikirk says:

        Yeah, can find a spot for a propane tank, but not particularly safe to carry full time without an approved (or similar) “vault” that is vented to the outside. Simple cabinets and a 12v fridge. Will probably stick with the water jugs and camp stove for the initial build. Thinking e-track and beam brackets for the bed support.

        We can probably get what we need in a 140/144 but definitely more room in the 158/170. Looking for a good pre-2006 to build on. Prefer the body style and engine, but hard to find with reasonable miles at a reasonable price… Our rafts might take up as much space as your bikes! Right now we travel in a Toyota Tundra with a tall shell, so would be a vast improvement is space and mileage.

        Reply
  19. Mike
    Mike says:

    This has been a great inspirational read on a warm ‘winter’ morning up here in Alberta, Dakota – obviously a lot of people have appreciated it in the same way that I have. I’m not close to doing a build-out but it’s definitely on my mind as a home-away-from-home in later years as I ramp down on the work front and head back on the road to climb and ride. Two questions when you have a moment though that have sprung to mind while reading this morning:
    – There’s no mention of whether you went with the 4cyl or 6cyl version of the van – any comments on that based on your experience on the road to date?
    – The bed layout – I’m presuming that it runs side-to-side in the van from what I could tell in the pictures. I’m 6’2″ tall and although I don’t often sleep stretched out, when I read on the van specs that the max floor width is 70″, I wondered how a length-wise alignment of the bed would impact the interior space remaining for the kitchen.
    Your thoughts on these are most welcome when you have a moment. Thanks again for documenting everything with such enthusiasm!

    Reply
    • Dakota
      Dakota says:

      Ah, so you guys are in midsummerwinter just like us, eh? Glad the post helped get you fired up. Doooo it! Sprinters (well, the freedom they represent) are awesome.

      Ours is the 6 cylinder version of the van. No namby-pamby stuff – we’re hauling bikes and gear up steep passes! That said, I have no idea if the 4 cylinder performs well. I like the 325 ft/lbs of torque, gotta say.

      Our bed is length-wise, actually, It’s a queen bed, though I cut ~1 ft off the end of it, bringing it to 6′ long exactly. Works fine for me at 5’11”. Cross-wise can work with the (expensive) carbon flares that some companies are doing now.

      Let me know if you have any other questions!

      Reply
  20. Paul
    Paul says:

    Hola Dakota! I have an old 2004 Dodge sprinter that I’m converting.
    I’ve been doing a lot of research on fridges and was glad to see your
    review on the Isothermcr-130. It was on my list as an option. In fact I
    was close to pulling the trigger on it when a gentleman at a local
    fridge shop got me thinking about it all over again. He said that there
    are some real efficient 120V compressor style fridges on the market
    that compete with the DC compressor fridges. (seems like evaporator
    type still isn’t very good, maybe never will be as good) So I was
    wondering how you calculated the “10x more efficient than dorm room
    style fridges” and what your baseline fridge(s) was for the
    calculation. Please excuse me if this was just a rough estimate and I’m
    taking it too literally.

    I wanted to come up with a baseline comparison between them so… AC fridges have to be sold with a kWh/year stamped on them by the US Government. The DC fridges might not have to be or are at leas difficult to find so I calculated them based on user reviews. Here’s what I came up with:
    AC fridges: Avanti RM4406W uses 228kwh/year, Summit ffL5 uses 298kWh/year
    DC fridge: Isothermcr-130 uses about 103 kWh/year

    With respect to my calculations based on user reviews, you said the Isothermcr-130 only
    pulls 2.5 Amps but the spec sheet I saw said 5 Amps. Was that measured running amps? Perhaps they included a start up spike as 5 Amps in the spec. Regardless I calculated with 2.5 amps assuming it was a measurement you took and your estimated duty cycle of 40% to come up with 104kWh/year. After more time with your fridge do these estimates still hold up? If the 2.5 amps is not measured, I could be looking at an AC fridge being very close to as efficient as a DC fridge. (note that there is the obvious 5-15% decrease in efficiency converting from DC to AC)

    Thanks in advance for any insight and great job on the van and this page. Very insightful information.

    Reply
    • Dakota
      Dakota says:

      Hi Paul! Great questions. Obviously you know your electric stuff.

      Sorry – that 10x more efficient comment was more of a joke. More like 3x more efficient, based on what I saw. However, it really does only pull ~2.5 amps (after the 5 amp startup), at least based on what I’ve seen with extensive use over 8 months, even down in the hot desert in the summer.

      The biggest sell for me on the CR-130 was the space for food. With a couple 100W solar panels on the roof, you’ll easily be able to supply sufficient amperage for whatever fridge you buy. I frankly didn’t want to run one off DC power due to the losses and just plain strain on the inverter – no need to wear it out faster, right?

      All that said, I bet whichever you choose will work great! Good luck with your build and happy trails.

      Reply
    • Dakota
      Dakota says:

      Hey Tim,
      I’d say the choice is dependent on 1. how you plan to use the van and 2. your hobbies. For us, the 144″ is ideal and I am glad we chose it. Anything bigger is tough to drive around towns, won’t fit in parking spots, and (I would guess) not as good at navigating rutted roads. That said, if you are into motorcycles and want a big storage area at the back of the van, a 170″ could be necessary.

      All to say that I think either could work well! Good luck with your project.

      Reply
  21. FarNorthWind
    FarNorthWind says:

    Thanks much for the details. We just spent a year traveling the perimeter of the US in search of birds living in a Chevy Express van and now your Sprinter looks sooooo much more comfortable so will move up….
    One item you should stock in your Adventure Van is a solar powered light – d-Light. An absolutely wonderful invention that was developed for third world countries. We used ours every day! Of course, available on Amazon….

    Reply
    • Dakota
      Dakota says:

      Yo yo FarNorthWind,

      Thanks for stopping by! Did you find some awesome birds? I just rolled through the Steens Mountains and I hear that is a hot spot for bird watching. My in-laws love it.

      We have solar on the van, which powers the LED lights in the van. We also have rechargeable LED headlamps that we charge off the solar/battery system in the van. What application did you use your d-Light for?

      Here’s hoping you get out on another trip sooner than later. Gotta love the open road!

      Reply
  22. FarNorthWind
    FarNorthWind says:

    LOVE the Steens – we now live in the Cosmic Hamlet of Homer, Alaska but enjoyed 17 years in Portland and often visited Malheur refuge and eastern Oregon. Our van was decidedly low tech; platform bed with under-bed storage, a couple of storage chests, a cooler plugged in to the cigarette lighter and the d-light for illumination. The best investment by far was the d-light! check it out.

    Reply
  23. Don White
    Don White says:

    Dakota,
    You mentioned about adding a 2 drawer dresser. Could you provide details and maybe some pictures. I am looking to do the same. Tks

    Reply
    • Dakota
      Dakota says:

      Howdy! I think you’re talking about a rear sliding drawer in the rear? I simply put in another drawer on 36″ slides and bought a couple plastic storage units from Target. On the road conversion! I’ve attached a picture here. Works great for gear storage and things we don’t want inside the van.

      Reply
  24. Adal
    Adal says:

    Hi Dakota,
    Great write up: more details and easier to read than most posts on the topic!

    I have a question regarding budget. You didn’t address price much except for the individuals items used in the project. Can you share a vague estimate of how much you spend on the van, the conversion and the total amount for this project?
    I’m looking to build a van of my own and was hoping I could keep it under $10K but I’m afraid that might be overly optimistic…

    Reply
    • Dakota
      Dakota says:

      Glad it was helpful! I basically did a brain dump and hoped it would benefit some people. 🙂

      I think $10k (plus the van cost) is reasonable if you do all the work yourself. Our total build was about $20k, but that included ~$2,500 for the side/rear windows, which didn’t come installed, plus an expensive stereo system and sound deadening that probably isn’t necessary for most people. I sure do love it though.) $10k is totally reasonable, especially if you go with middle-end/used gear for, say, the inverter, solar, fridge, etc. I feel like most major components in the van are $1,000.

      As the for the cost of the van new, it totally depends on the specific build. Ours was $39k out the door, including registration. Considering our tenants have paid our mortgage for the last two years because of the van and totally covered that cost, I feel like we are winning!

      What kind of setup are you aiming for, and what kind of activities is the build designed for? Drop me a line anytime with questions. Good luck with your build.

      Reply
  25. berry schwartz
    berry schwartz says:

    Hi,

    I’m intrigued by those bike trays and trying to understand how you mounted them. It looks like the only thing attached to the floor is a piece of plywood, about the size of a 2×4, standing on edge. Is that right? Is it bolted just to the wood floor or also through the sheet metal floor of the van?

    I’m also curious, did you build a floor, or buy the van with some kind of floor already installed?

    Thanks for sharing your great ideas, writing and photos! It’s an inspiration.

    Reply
    • Dakota
      Dakota says:

      Hey! We love our bike drawers. Wouldn’t have it any other way. There are shots of the install down in the big gallery of pictures at the bottom of the post, and more info below here.

      Our van came with the stock wooden floor, which is ~3/8″ plywood with a durable coating on it. The vertical pieces of wood are 3/4″x6″ hardwood, which the slide-out rails mount to. Those vertical pieces of wood are mounted with angle brackets with bolts that attach to threaded inserts like these (http://bit.ly/1PQYufV), which do NOT penetrate the metal of the van (I avoided that whenever possible). Good luck!

      Reply
  26. anthonykahn
    anthonykahn says:

    This is an inspiring DIY for cyclists and campers . As a furniture maker with a shop, I would consider making the bike storage area with the wall behind the bikes removable so I could fit furniture (buffets, long low bedroom pieces, etc.) for deliveries through that space. I also would need the passenger side cabinet to be removable for hauling payload. (And maybe occasionally the bed, but I’d be reluctant to remove that.) We’d stuff bikes in and around the payload or use a hitch mount rack, then when the furniture is delivered, re-install the divider behind the bikes, and carry on with the fun half of our trip. I’d probably just use the bike storage area without the pullouts, and lean-and-tie off the bikes as I now do with my pickup, thereby making the flat floor clean for the cargo.

    Can you see this as a reasonable way to go? We have tented for years, so a rig like this- with LED lighting and a refrigerator and awning etc would be a huge upgrade.

    Reply
    • Dakota
      Dakota says:

      Howdy! It is totally possible to build what you’re talking about. My bike drawer install is modular – check out the picture gallery to see the screw-in inserts, which flush-mount into the floor. It would be easy to have a pass-through for loading furniture. In fact, if I built this again, I’d have that anyway! With your skills, I say go for it. Can’t wait to see your final build.

      Reply
      • anthonykahn
        anthonykahn says:

        It’ll be awhile before I can look at the costs- son will be going to college in two years, and this a biggie.
        What do you think it’d be like forgoing the passenger side cabinet and instead just securing some gear there with floor straps- in plastic storage trunks? Do you see that passenger side cabinet as indispensable to the overall outfitting?

        Reply
        • Dakota
          Dakota says:

          Nah, you could easily get by without the passenger side cabinets. It is even more doable if you have overhead cabinets on the driver side. Many people don’t have the door cabinet and do fine!

          Reply
  27. Gil
    Gil says:

    Hi Dakota, I enjoy reading you sprinter van conversion posts. Thank you for sharing it. I am inspired of getting one myself and DIY the rest. May I ask if you have to lower your bike seat posts under the bed space when stowing them. Will a standard (low roof) sprinter van will work if the sleeping quarter is over the bike space? I do like to travel with my road bike and outdoor adventures, camping and backpacking. Hope to hear from you and enjoy your upcoming tour.

    Reply
    • Dakota
      Dakota says:

      Hi Gil! We don’t drop our seats on three of the bikes, just on my big touring bike. With a low roof, you’re going to be cramped for sleeping space with the bikes up there I think. I’d do a lot of measuring to make sure it will work. If I were you, I would absolutely spring for the high-roof version – it is so much more functional, especially if you plan to travel long-term in the van. Good luck!

      Reply
  28. myke
    myke says:

    Do you have a total cost of everything (van included)?
    Any concern of off-gassing of vocs from a new vehicle interior and sleeping in there?

    Reply
    • Dakota
      Dakota says:

      We hate that new-car smell too (it’s like cancer seeping into our veins, let’s be honest!). The interior didn’t have much of a new car smell because there isn’t a huge amount of upholstery. That’s for the cargo van – maybe different for crew version.

      Van was $39k (very few frills on it since we felt we didn’t need them) plus $2k to add rear windows and opening side windows. Then another $13k on top of that to finish it off, roughly, though I spent a fair bit on the stereo system/sound deadening that you could easily avoid.

      Reply
      • myke
        myke says:

        Awesome, thanks for the info!

        Yeah, the cargo van does have less upholstery and plastics. Hope you are keeping the thing for the long haul, you put a ton of work into it!

        Reply
        • Dakota
          Dakota says:

          Sure am! We’ve traveled in it for about 10 months at this point, and plan to hang on to it for the foreseeable future. It wasn’t THAT big a project – I totally recommend doing it yourself to save a ton of cash and have a satisfying result to boot!

          Reply
  29. Kate
    Kate says:

    Hi Dakota and Chelsea, While I have read your blog previously, I was re-reminded about it today by one of our mutual friends, JD. (We met today while he is traveling across the US) I had expressed my partner’s and my desire to outfit a Sprinter van with the purpose of hauling our bikes and travelling and JD quickly wrote down your names for me to follow up on. Anyway…thank you for the inspiration and the details on how you approached your sprinter conversion. We hope to do the work ourselves, as well. Enjoy your European travels!
    Kate

    Reply
  30. gary
    gary says:

    Great site!

    Considering sprinter, but read of many mechanical oddities and issues with service and access! To service and $$$$
    And the post 08′ models seem more problem prone.
    Of course you purchased new.

    Has the rear wheel drive proved a liability on fire roads?
    Considering the awd chevy express, but sacrifice headroom and European details and any hope of ever reaching 300-400 thousand miles…

    Enjoy your travels

    Reply
    • Dakota
      Dakota says:

      Glad you found our site helpful. In my experience, the RWD has been totally fine on fire roads unless there is mud, ice or sand. The Sprinter doesn’t back up over slick surfaces very well, especially if you don’t have weight in the back.

      I will say that the headroom is one of the major reasons we went with a Sprinter. For us, it was non-negotiable – we wanted to be able to stand up without popping the top on a vehicle.

      As for maintenance, it (so far) hasn’t cost anything except a standard oil change for $100 (it holds a lot of oil). Our EGR (recirc for diesel fumes) is fouled after 20k, but that’s a common thing for diesels and a cheap fix.

      All in all, the power, headroom, and solid build to the rig are treating us well. I would definitely check out the Transit or Promaster these days if I were considering a van though. Good luck!

      Reply
  31. CB
    CB says:

    Thanks for the helpful writeup Dakota. My girlfriend and I are preparing to spend next year on the road and are starting to outline our plans for a sprinter. Since we both plan to work 40ish hours a week we had assumed that we’d need the extra space of a 170, but your post has made us reconsider if we can make a 144 work. Our storage needs are similar to what you have, so I was wondering if you work for extended periods in the swivel chairs, and if you think it’s plausible, and comfortable for a 144 to have two workspaces with multiple monitors.

    Thanks,

    CB

    Reply
    • Dakota
      Dakota says:

      Hey CB, congrats on prioritizing an adventure like that!

      I would go for the 170 if I were you. With two people working that much, you’ll be spending a lot of time inside and comfortable seating will be important. I found it difficult to get comfortable in the stock Sprinter seats and (I think) those are the only ones that swivels work for. I wound up standing up to work to mix things up using the bed as a standing desk.

      I was also only working ~20 hours per week while traveling; full-time for two people would be a different story. Good luck, and feel free to drop me a line again anytime.

      Reply
  32. Brittany
    Brittany says:

    Hi there!
    My fiance sent me your blog to show me the collage on your About Us page, totally something I would make 🙂
    We too are adventuring about, living in a Sprinter Van that is quite similar to your set up! We got rid of the booth in the back and installed a raised Queen bed so we can fit our mountain bikes, camping gear etc. in an area we like to call “the garage.”
    We’ve been on the road 8 months and are still going strong!
    Keep on adventuring, we would love to meet up somewhere someday!
    Adventure + love,
    Brittany (& Drew)

    Reply
  33. Norm
    Norm says:

    I enjoyed reading about your Van build. I just got my new sprinter and will use some of your ideas. I had a question about how exactly are you charging you house battery while driving. Are you using a battery to battery charger or an alternator to battery charger?
    Thank you,
    Norm

    Reply
    • Dakota
      Dakota says:

      Hey there Norm, glad you found it helpful. Congrats on the new van!

      The alternator charges the house batteries while driving. I think a battery-to-battery connection creates some issues. Good luck with your build!

      Reply
      • Norm
        Norm says:

        Thanks for the reply. Could you tell what equipment you installed to charge the house battery from the alternator? The issue I’m facing is with the smart alternator reducing the voltage output when it senses the starter battery charged. Also, did you need to install any type of relay so the solar doesn’t charge while you are driving or does the controller figure that out?
        Thank you.

        Reply
        • Dakota
          Dakota says:

          So far as I know, the solar charge controller handles that (at least for the system I installed). Because I didn’t have a lift for our van, I didn’t install the house battery/charging system for our van – Van Specialties near Portland, Oregon did it for us as well as the alternator install. I frankly don’t know the exact details of the hardware that connects to the alternator, sorry! I’d post something on sprinter-forum.com – there are lots of technically savvy people on there who will help you out.

          Reply
  34. clyde
    clyde says:

    Awesome Blog

    1. I’m planning to insulate my 2014 144 HR passenger van. I like the denim water heater blanket option – how did you attach it to the ceiling? Spray glue? Did you go with reflective side against the steel – or soft side against the steel?

    2. On the heater install – was there a reason you chose the Espar over the Webasto?

    3. How did you fasten the batteries under the floor – did you use a tray or a box?

    Thanks!

    C

    Reply
    • Dakota
      Dakota says:

      Hey Clyde, glad you found it helpful!
      1. I attached the insulation with aluminum tape. The stuff that comes with the insulation is finicky, so I recommend buying a specific aluminum tape that is a bit thicker and easier to work with. I went with reflective side in for ease of installation and because I don’t think it makes a huge difference in the heat regulation.
      2. Espar had the most information online and seemed highly regarded. I bet Webasto works fine as well.
      3. The batteries are held by a welded L-bracket rack (basically a suspended four-sided rectangle) that has worked great.
      Good luck with your build!

      Reply
      • clyde
        clyde says:

        Thanks. That was super helpful. I need just a little more info on the batteries – are they in waterproof battery boxes – on top of the frame? Or perhaps I should ask – how do you keep the road wet and grime out of the contact points?

        Thanks again,

        C

        Reply
        • Dakota
          Dakota says:

          The batteries are on top of the frame, but are not in a waterproof box. They are midway between the front/rear wheels and so far we haven’t had any issue with the contact points. Knock on wood! (For the record, Van Specialities in Oregon installed the batteries since we didn’t have a lift to get under the van.)

          Reply
          • clyde
            clyde says:

            Thanks – that was helpful. I’ve heard nothing but great things about VS – if only they had an outpost in the North East!

            Best,

            C

  35. Caleb
    Caleb says:

    Thank you so much for all your detail! This really helps a lot for us researching everything to be able to find the best route to make van living our lives. Super impressed with your site!

    Reply
    • Dakota
      Dakota says:

      Glad to hear it, Caleb. What kind of rig are you looking to get? One of these days we’re going to add a “favorite things” area to the site, plus a video tour of the van. Maybe I’ll even get around to a “here’s what it’s like living in a van.” Just too many things to do in this life, eh?

      Good luck with your new trajectory! Drop a line anytime with questions.

      Reply
  36. Don
    Don says:

    Wanted to say thank you for all the information on the bike trays. We have a Sprinter 170″ WB with a platform bed. We borrowed your ideas on the trays, went with two trays due space limitations with interior water tank located in storage space. Just can’t say enough about how your ideas and made the work/build go amazing.

    Reply
    • Dakota
      Dakota says:

      Sure thing Don! Yeah, four bikes takes up a lot of space. If our hobbies change, we’ll likely drop one of the trays for water or other storage. For now, it’s working great. Hope your build allows you to have some great adventures.

      Reply
  37. clyde
    clyde says:

    Just a quick question: Do you drive in winter/ski country? And if so do you put snows on the van – and what kind are you using?

    Thanks,

    C

    Reply
  38. Hans Early-Nelson
    Hans Early-Nelson says:

    Wow you two did it up! Had to write you guys with a somewhat winded hello

    To introduce ourselves real quick, my name is Hans, some call me Hansi. My partner Liz, our 22 month old son Eisen and I will be hitting the road in January for a few month journey of the southwest and cali. We will be equipped to continue our creation of metalwork (jewelry, wedding bands, small welding projects, etc.) which supports us both here in Minneapolis, MN.

    We have taken a big turn in our buildout since starting to read your blog. As in going from “nah we don’t need a fridge, or our vitamix or our juicer, or to charge the battery powered welding machine” to “woah, whaat? these kids did it up, lets do it up!”. We liked your solar/inverter set up and have begun the process of ordering everything for our 2005 144″ dodge sprinter. We will also be picking up an Engel for our beer, cheese and meat needs.

    We have a few questions:

    1.Say we are going the 200 watt route, Is there a reason to go with multiple 100 watt panels vs. one bigger 200-300 watt panel?

    2.Can you explain why you chose 6V batteries over 12v? I was looking for anything in the comments but you just talked about placement, which I love by the way.

    3.Forgive me if I didn’t look through all your process photos… Did you put a vapor barrier between the denim and the final 1/8″ ply?

    We find it amazing how generous and thorough you are with your writing and responses to questions, we can’t wait to get on the road, settle in and share what we know and have learned from you and others along our way!

    Be well!

    PS never hesitate to hit us up for custom metal bits along your travels. I can fabricate brackets, hooks doodads and dinglebobs from most metals- and am especially stoked to do so on the road!

    Hans , Liz and Eisen

    Reply
    • Dakota
      Dakota says:

      What’s up Hans? Glad my write up helped you out. Way to get out there and explore You’re going to have an awesome time.

      1. I did multiple panels because I couldn’t find a bigger one that I liked, and also so that we could add panels if we needed them. I’m sure a bigger panel would work fine.

      2. 6V in series is cheaper and a more common application, so I went with that.

      3. What, you didn’t look at everything?! Forgiven. No vapor barrier, just the reflective backing on the insulation.

      Good luck with your buildout and happy travels!

      Reply
      • Hans Early-Nelson
        Hans Early-Nelson says:

        Hey thats perfect. Thanks for your reply!

        I have been trying to find the best deal on those batteries. I found a place in Florida with the Full Rivers. Does $590 for a pair shipped seem reasonable? Where did you pick yours up?

        Be well and perhaps we shall cross paths out there somewhere!

        Hans – Liz – Eisen

        Reply
        • Dakota
          Dakota says:

          It’s a small world, could happen! No idea on the price – haven’t looked for a couple years. There’s a link in my post for what I recommended back when I wrote this.

          Reply
  39. Rene Bruz
    Rene Bruz says:

    Hey there, great build ! I wanted to ask you if you have driven south of the US yet ? I’m gonna do a diy and it seams the newer vans 07> can’t roll down as the low sulfur fuel lack of factor. So I’m looking at 04-06 because of that, wanted a newer 4×4 but if I can’t drive it to Costa Rica etc won’t work for me. Thanks !!!

    Reply
    • Dakota
      Dakota says:

      Nope, haven’t driven that far south. Many people have though (check out sprintervandiaries.com). I’m pretty sure you’ll be fine down there.

      Reply
  40. Michael Dorian Bach
    Michael Dorian Bach says:

    “Cascade Audio absorptive layer on floor to help silence road noise.” – I was on there website and didn’t see a specific reference to this product. Can you post what exact product you used for your floors?

    Reply
  41. Shawn
    Shawn says:

    I was wondering if it is possible to remove the tray from the heavy duty sliders like you can totally remove a drawer from a cabinet. We are hoping to store 4 bikes on one tray, but remove the tray when we are not traveling with them. Thanks.

    Shawn

    Reply
    • Dakota
      Dakota says:

      Nope! Can’t disengage the slider assembly. A surprise to me recently when I bought a new bike and needed to revise things. I recommend setting things up with the screw-in bolt bases like the ones I used (check out the in-progress shots of the van).

      Reply
  42. Derek
    Derek says:

    Hey Dakota,
    Great site, I used the info found here on my first build, and am just about to start all over (all those “next times” came true)! I’d be curious to learn more about how you installed the batteries underneath the vehicle. I understand you had someone else do this, mind sharing a price range for something like this? Are the batteries enclosed or open to the elements? I would think water contacting the terminals would be an issue?

    Reply
    • Dakota
      Dakota says:

      Yo! Glad it’s helpful. What did you change for your 2nd build?

      The batteries are not enclosed, but I haven’t had any issues. It is mounted far enough inside the frame that I don’t think any water gets up there. As for the price, it included the batteries so it probably won’t help you. It worked out well because we got wholesale on the batteries through the company. I suspect it would be $100-$200 for them to install it, including the hardware. I’d do the same thing again! Good luck with your new build.

      Reply
      • Derek
        Derek says:

        Selling my 1997 Econoline and bought a 2015 Promaster 2500, a bit of an upgrade to say the least. Just started so we’ll see.

        For that price I’d go that route too! You go directly through Full River? If I could get some contact info on where you had it done that would be awesome. Thanks!

        Reply
    • Dakota
      Dakota says:

      Hi Joe, the price of Sprinters varies a lot depending on the features you choose. Base price can range by $5,000+ or more quite easily. Check out the online pricing engine that Mercedes provides. I frankly have no idea how much they cost since I bought ours two years ago. Cheers!

      Reply
      • Dennis
        Dennis says:

        Hi Dakota,

        Just to update the Sprinter pricing info. During our search in spring of 2016 we were offered a new high roof 144″ cargo van for $38k. That was with the 2.1L 4 cyl diesel..

        Reply
  43. Ken
    Ken says:

    Hi Dakota,

    Expecting new 170 high top any week now and will start build; very much appreciate all your ideas and will borrow from them. Also love your approach to life and traveling and saw that we were on Salzburg about the same time and we also did Coeur d’Alene and Glacier this summer.
    Question: any problem with shade on the solar panels from the awning causing problematic drop in output?
    Thanks!

    Reply
    • Dakota
      Dakota says:

      Hey, you’re living it up! Great to hear. As for the awning, the way it mounts puts it close to parallel with the panels (it sticks up maybe 3″). We didn’t see any decrease in output whatsoever. Happy van building!

      Reply
  44. John
    John says:

    A whole load of pure awesome. I’m inspired, and still a few years away from emulating you but this blog entry is already saved whole cloth for reference. Thanks so much, and all the best in your adventures…

    Reply
    • Dakota
      Dakota says:

      Thanks for the kudos, John! Glad to get you stoked and dreaming. Drop me a line anytime with questions on your future build.

      Reply
  45. Dennis
    Dennis says:

    Hi Dakota,

    It’s been fun following your adventures. My wife and I will be retiring this summer, and hope to emulate your life on the road – running a small business and/or rental properties remotely, living in a van for long outings, lots of biking, hiking, etc. I showed my wife a ton of youTube vids of people doing, and then using, cool camper builds in Sprinters; her stock response was “I’m not an RV person, and I can’t believe you’re turning into one.” It was YOUR detailed build description that changed her mind. We rented a Sprinter-based campervan for a trip to Moab last spring, and she was hooked. So, thanks for lighting the spark…

    A question: was there anything about the electrical configuration of the Sprinter as you bought it that was desirable for the later buildout as a camper? Also, any desirable Sprinter options when you bought it? I saw in the questions that in retrospect a backup camera seemed desirable (Yes!!), and maybe the upgraded steering wheel. Anything else that springs to mind. I liked the one we rented, but have not idea how it was equipped.

    The other question is about water use. As far as I can tell, you’re still carrying water in glass jugs, pumping with the Helio (cool device by the way; we bought one), and heating using an electro-powered boiler. How big are the jugs, and how many do you typically carry? How do you fill them, and how do you secure them in the van? Also, I didn’t see any mention of the type and capacity of the boiler, and wonder how you fill it with water when needed, and move water out of the boiler for use in dish washing or a shower.

    Like you, we’d rather avoid the hassle of installed water reservoirs, lines, etc. both for convenience and cleanliness, and because we probably WILL use our camper into the winter months. We’re trying to work through what our water requirements will be, and how we can manage them. The rented camper had a large onboard reservoir, lines to a fill port on the outside (also used for “shore water”), a big gray water tank with empty port to the outside, electric water heater, sink with electric pump to it, etc. Nice to use, a colossal pain to maintain. We want simpler, and are trying to decide how MUCH simpler.

    OK, one final question and I’ll leave you to the mountain bike (what are you guys riding? Look sweet!). You discuss using a wi-fi hotspot, either a MiFi or your iPhone configged as a hotspot. How big a data plan do you have to make this work? Seems like the mobile data could cost a fortune…

    Thanks for keeping up a great blog. We came to you guys at the end of our careers. I wonder what we might have done if I’d read this when I was in my 30s….

    Reply
    • Dakota
      Dakota says:

      Hey Matt! I think it really depends how you plan on using your rig. A 4×4 racing instructor and Sprinter owner recently told me he thinks the 4×4 isn’t worth it given the traction you can get with a set of solid all terrain tires on there. I tend to agree! If you plan on hitting some serious offroad stuff and need extra clearance, perhaps it’s worth it…or perhaps towing a Jeep makes more sense. With all the shit inside banging around, who wants to offroad a camper van anyway? FWIW, we have driven our van at the gnarly entrance to Gooseberry Mesa in Arizona and in many other dicey areas and been fine, and that was before I bought better tires. Hope that helps!

      Reply
      • Dennis
        Dennis says:

        Two circumstances where 4wd might be desirable. First, a lot of mountain/desert dirt roads after a rain. Some of the soils can get pretty strange – slippery, gummy. I suppose planning for a day or two extra water and food would allow that problem to resolve itself. Second, winter where I live (Great Lakes). Not looking forward to, after a lifetime of front-wheel drive and AWD cars, driving a rear-drive tall van in the snow. It could be argued that significant snowfall signals it’s time to put the rig into hibernation, but we plan to test the limits of ours this winter.

        Otherwise, I have to agree with your general comment – why take a camper van on a truly primitive road. It’ll beat the heck out of your interior if nothing else. Might be time to park the rig, load the bike camping gear on the mtn bikes, and pedal the last few miles to that truly remote place.

        Reply
  46. Bigfoot
    Bigfoot says:

    Thanks for the great write up! I’ve been building mine out slowly and am about to go on a spurt, and I was curious if you had more details on the sub mounting under the pass seat? I know where everything else is going but I haven’t figured out where to mount the sub, and I want it functional, yet hidden. Great job, thanks!

    Reply
    • Dakota
      Dakota says:

      Yo Bigfoot! The sub box fits a 10″ woofer and mounts directly in the cavity under that seat. The box is at a slight angle (low point toward front of van, rising toward back) with the back corner fit off. Sounds great and gives a great butt massage to the passenger when the bass is cranked. Sorry, no pictures of it… Good luck with your build!

      Reply
      • Bigfoot
        Bigfoot says:

        Haha, yeah I was wondering if that would get annoying for the passenger? Any complaints? Thanks for the info!

        Reply
        • Dakota
          Dakota says:

          There’s a bass control knob to turn it down, so it works out ok. We tend not to crank the volume ALL the way up…unless it’s Macklemore, of course!

          Reply
  47. David Kozak
    David Kozak says:

    Hi D + C!

    First, thanks for cataloging all of this, it’s immensely interesting and very comforting to know that it’s possible for a couple to live, work, and travel comfortably out of a Sprinter van. Kudos to you guys!

    I’m (at least!) a year out from buying a van and starting this kind of endeavor myself, but I’m beginning my research. I’ve seen plenty of people on the Sprinter forums complaining about mechanical issues, repair problems, etc. Wonder if after a couple years in the van that has been a problem for you guys at all? Also curious to know if any other vans (Transit? Promaster?) have caught your eye.

    Enjoy Iceland! If you have to opportunity to make it into the highlands the hikes (and rides!) around Landmannalauger and Thorsmork are terrific, as is the Laugavegur trail that connects the two. It’ll be a bit crowded this time of year but if you get an opportunity it’s well worth the 4 day journey.

    Reply
    • Dakota
      Dakota says:

      Hey man! Glad you found it helpful.

      Our Sprinter has treated us well, but we only have 30k on it so far since we bought it new. We did have an issue with the EGR valve getting sooted up (it’s part of the diesel emissions control). I would definitely consider the Transit and Promaster if I bought again. Those weren’t available when I was looking at vans, so I don’t know much about them. Gas will certainly have fewer emissions controls, which could be nice…

      Iceland is so great! Thanks for the tips. We are doing six days on the Landmannalauger trek, and I’m hoping to catch an MTB ride next week as well. Definitely high season around here, but no worse than other places we’ve visited. Traveling in a camper van has opened up all kinds of off the beaten path chances to wild camp away from everyone.

      Cheers, man! Good luck in your camper van journey. Nothing like the freedom of a van to build a life of adventure around. Drop me a line with any questions in the future.

      Reply
  48. Christopher
    Christopher says:

    Hi Dakota,

    I really enjoy your blog. There is alot of great information here! Both you and Chelsea sound like awesome people!

    My girlfriend and I are currently building out our E250 and I was hoping you’d be able to give me some insight into how you rigged up your amp/sub/stereo. I’d like to be able to use my system via the house batteries and it looks like you’ve managed to accomplish this. Do you run the amp and stereo directly to the house batteries via a distribution panel? If so how do you mitigate voltage drop on the run from the house batteries to the stereo in the dash of the van?

    Thanks for any help you can provide!

    Reply
    • Dakota
      Dakota says:

      Howdy Chris, thanks for stopping by! Glad you dig the blog. For the stereo, I have an amp powering the sub/speakers. That amp is powered by the 12V battery system and is located right next to the fuse panel, so there isn’t any voltage drop to deal with. For the stereo, I just ran fairly low voltage wire from the panel to the head unit. Hope that helps…a little vague, and I don’t have a wiring diagram… Have fun with your buildout!

      Reply
      • Christopher
        Christopher says:

        Dope! I noticed your amp was right next to your panel in the pictures. I was more concerned about the head unit which you addressed.

        Thanks for the response. This is super helpful!

        Reply
  49. Odessa
    Odessa says:

    How did you run power to the fan? I am installing a similar power setup in my fan and have been trying to figure out how to run power to the fan. Is it connected to your batteries or powered from somewhere else?

    Reply
  50. Jack
    Jack says:

    Dakota,

    Great info on the Van build up greatly appreciated. I am currently building up a 2012 170 High top. Did you just put the fridge in front of the inverter behind the drivers seat? Also how many 110 receptacles did you install in the van?
    Thanks,
    Jack

    Reply
    • Dakota
      Dakota says:

      Glad you found it helpful! Yep, fridge right in front of inverter, though I can get to the inverter’s right side. I have three 110 receptacles and two 12v usb charging plugins with two plugs each. Works great! Good luck with your build, man.

      Reply
  51. Ryan Craddock
    Ryan Craddock says:

    Grateful for your sense of humor and this “blog” – for lack of a better word. Great stuff, great resources. Dropping a few windows in my 170 Sprinter this coming weekend, along with a Renogy Solar Panel system not far behind. Appreciate everything – safe travels, my friend.

    Reply
  52. matt
    matt says:

    The Wife & i are contemplating 144 vs the 170 right now for long term living. One of my major concerns is regarding sleeping arrangements. I’m 6’2 and need to be able to stretch out. we are thinking with a 170 we could put queen sized bed in and be able to sleep front to back ( parallel with the van ). vs the 144 in a perpendicular orientation. So my question is, how is your bed arranged perpendicular or parallel? and can you stretch out in orientation of your sleeping arrangement?

    Reply
    • Dakota
      Dakota says:

      Yo! No way you’ll fit cross-wise without popouts. We sleep parallel with the van and the bed is exactly 6′ long (about my height).

      Reply
    • Dennis
      Dennis says:

      I’m 6’1″, and found that sleeping across the Sprinter requires a side sleeping/curled up position. No way I can stretch out. Our bed is oriented front-to-back. We wanted a little more living space than a full bed in the back would allow. My wife developed a clever hack that gives us two built-in chairs that convert into an extension of the bed platform. Chairs/storage by day, bed platform by night.

      A 170 will certainly give you more living and storage space, both considerations for long-term living. I just can’t imagine maneuvering a vehicle larger than our 144.

      Reply
  53. Udo
    Udo says:

    Interesting site and always good to hear other experiences. I will order the door stopper…Now for the gold standard in RV design I always look to the fatherland. The devil is in the details and these guys are very good. Check out the high quality compact design of this VW van with a Woelcke Expedition build and this swiss guy who it from Argentina to Alaska https://www.youtube.com/watch?v=HBDPRYjGZi4
    They also construct this on a MB Sprinter cab chassis.
    Travelling the Pac NW in a Sprinter Sportsmobile Pop Top.

    Reply
  54. Bryan
    Bryan says:

    Did you consider power products like the ones offered by GoalZero or Enerplex when developing the solution you used in your van? I am about to build my first Sprinter and I am debating which way to go. The van is equipped with an additional battery package, I think I will use it to power LEDs and add additional capacity for the refrigerator. Thoughts?

    Reply
    • Dakota
      Dakota says:

      Hey! Nope, didn’t look at GoalZero, but they were not as strong a presence when we did the buildout over three years ago. I know they are great now, as are the Renogy systems. I’d check all that out if I were you!

      Reply
  55. Bruce Braley
    Bruce Braley says:

    Hi Dakota,

    I bought a used 2007 ex-FedEx 170″. The pollution controls on it are so good that even though it was burning about a quart of oil per 50 miles, you couldn’t tell by looking at the exhaust. Bought a remanufactured long block from Netherlands and just had it put in. So now I’m committed to this van after my dream of owning one ever since they started importing them. I had owned a ’66 VW Transporter with Sundial camper since ’77, and finally sold it this year and am psyched about this huge upgrade.

    As a lifelong cyclist who is willing to limit the number of bikes he and his wife take with them to four 😉 I’m definitely going with your great idea of the garage under the bed and sliding drawers to mount them on.

    So here’s my question: I noticed that you have a narrower sled for the road bikes than for the mountain bikes, due, of course, to the relative widths of handlebars and tires. What width dimension did you end up with for each, and would you change either if you had it to do over again? Also, did you consider putting a road and mountain bike side-by-side on each?

    Can’t praise you enough for the quality of your blog and how useful it has been in helping us decide how to go about our own built-out!

    Thanks,

    Bruce and Deb

    Reply
    • Dakota
      Dakota says:

      I think that going road/road and mtb/mtb is the way to go. The wide bars on the mtb would mean that both trays would likely need to be wide to make it work. Certainly worth checking out though.

      Check out the bottom of the paragraph/bullet point about the bike drawers. All dimensions are there. What I recommend is starting there and then mocking up drawers with cardboard/cheap plywood to make sure they’ll fit in the space. Depends how you use the center space, of course… Our rear garage is dialed really tight relative to what most people do.

      Good luck, and glad you found the blog helpful!

      Reply
      • Bruce Braley
        Bruce Braley says:

        Thanks for the reply, Dakota! Somehow, I either read that before the dimensions were added (several months ago), missed that after they were added, or saw it and forgot (chemo-brain has me remembering stuff I never knew and forgetting stuff I knew for sure). Anyway, thanks to your guiding words, now I have what I was looking for and the project proceeds!

        I will probably dial tight, as well. I hate wasting space even though I got the 170″ van. If I use space efficiently, that leaves more room to move about comfortably without tripping over things that aren’t neatly stowed. It’s one of the reasons I appreciate your build-out so much!

        Yes, I have some old, crappy plywood that I can attach the fork mounts to and play with configurations. I want the bikes as close as possible without ever touching while in transit.

        I’m going to try a different approach to the sliders to save the expense. I’ll let you know how they turn out (for the benefit of others, since you already bought yours). Either they’ll work, or I’ll be sharing the failure to save others the trouble. I do like the heavy duty sliders you bought, but that’s a lot of tanks of diesel that we could be going somewhere awesome on, instead. We’ll see.

        Again, thanks for the inspiration!

        Bruce

        Reply
        • Dakota
          Dakota says:

          Ha, no worries! There’s a lot of info in that blog post so it’s easy to miss stuff. Those sliders are definitely expensive, but I gotta say they are GREAT and may be worth spending the money on. It’s only $350 to have exactly what you want without a bunch of screwing around. Just my opinion, of course, and I’d love to see what your solution is! Cheers.

          Reply
  56. Matt
    Matt says:

    Hey Dakota,
    I love coming to check your website to compare how I want to design my van, yours is a great inspiration. Just got a bed framed into the walls and am wondering what latex mattress you guys used? It is going to be an odd size for a bed and I will likely need to cut it down, any links would be appreciated. Happy travels!
    -Matt

    Reply
    • Dakota
      Dakota says:

      Howdy Matt! Glad you’re digging my site – just trying to give back to the van life world. As for the latex mattress, it’s from Foam Source in Colorado. We bought it second hand for 1/5 the cost of a new one… If you can get a thinner mattress that is still comfortable enough for you, I’d do that because it will buy you more head room or storage space. Good luck with your build!

      Reply
  57. Ryan Fletcher
    Ryan Fletcher says:

    Dudes – just wanted to toss you a shout out for the site. I helped me pull the trigger on getting myself a sprinter and rocking my own build out, which was crazy super fun (Im pretty sad that the build is over now actually). Her name is Dharma, there are some pics up on Instagram if you are so inclined https://www.instagram.com/climbguy_1/?hl=en

    We are hitting a tester trip to Chattanooga over Christmas and then a more extended trip starting in April!!!

    Thanks again,

    Ryan

    Reply
    • Dakota
      Dakota says:

      Yeah dude! Way to get after it – the build is fun, but the REAL good times are using the van for rad outdoor adventures. Drop a line if you’re ever out west in Dharma and we’ll go climb something. Probably a rock…

      Reply
  58. Shawn Michaels
    Shawn Michaels says:

    Wow! what an amazing van. I just want my van to be designed as same as yours. I totally love it. Thanks for sharing it here to get an idea. Just want to give a thumbs up to your amazing post.

    Reply
  59. Ed Backus
    Ed Backus says:

    Hey Dakota,
    Extremely helpful information. We are about to embark on a build-out, a 4×4 2017 144. Re: insurance – did Safeco (our regular insurer as well) require you to get a state of Oregon Insignia of Compliance plaque thus an inspection, or did the work done at Van Specialties qualify for those steps? Is your van classified as an RV by Safeco?

    Reply
    • Dakota
      Dakota says:

      Howdy Ed! Nope, Safeco didn’t ask for either of those items. I sent them some pictures and that was good enough to classify it as an RV. Noooot sure if that will hold water in case of an accident, but I’ve triple-checked with our insurance agent and she assures me we’ll be fine. Happy to pass along her name if you’d like, just shoot me an email (dakota@traipsingabout.com)

      Reply
  60. Raj
    Raj says:

    Fantastic content! I’ve been lurking on your campervan conversion post for too long not to post a thank you! My wife and I pulled the trigger on a Transit and will steal/borrow a bunch of your ideas posted here. Especially the 3 panel bed. 2K is just too much to pay! Question, was going to go with 1/2 ply framed by C channel aluminum. Think it will flex too much (300lbs combined)? Even with c channel on all four sides of each 2′ panel? Thanks again!

    Reply
    • Dakota
      Dakota says:

      Howdy! Definitely go 3/4″. Another reader just let me know he wasted $100 on 1/2″ ply with metal structural edging and it flexed like crazy. The weight difference isn’t that significant relative to water, gear, and all the awesome memories you’ll be racking up once you finish your build. Cheers!

      Reply
    • Dennis
      Dennis says:

      Another vote for 3/4″ plywood and the stoutest C-channel you can find. When we built out our Sprinter, we crafted the bed panels from 3/4″ plywood with 1″ structural aluminum C-channel members on each edge. We ended up having the back-to-back channels (the ones between panels) welded together to add rigidity and reduce the squeaking when we climbed on and off the bed, or one of us would roll over in our sleep. Dakota makes a good point that the extra weight (and cost) is not that much compared to the added comfort – and confidence in the bed’s survival.

      Reply
      • Raj
        Raj says:

        Ah, I see. Excellent point about the panel edges rubbing and extra rigidity. I’ve been spitballing with my brother about how to increase rigidity without fabricating an entire aluminum support structure. Thanks Dennis!

        Reply
    • Dakota
      Dakota says:

      Glad you’re digging it! Frankly, I can do both as well, yet chose to go this route for a couple reasons.

      First, many places that I want to take my van beat up a Class B conversion or you just can’t get there. So, it really depends on your desired activities. Secondly, I don’t like dealing with a lot of system complexity, and the construction in most RV conversions are notoriously finicky (depending on the builder, of course). I just wanted a simple base for all the awesome outdoor fun that’s available, and that’s what our straight-forward design gives us. To each their own, of course! Good luck with whichever path you choose.

      Reply
      • Austin Samuel Aho Adesso
        Austin Samuel Aho Adesso says:

        Hey, thanks for sharing your thoughts. I’m also curious what your wife’s thoughts are on this issue. Was the simple solution okay for her needs? I feel like every partnership requires compromises and while I would love something very simple, I’m curious how a females experience would be different on an extended (4+ month) trip.

        Thanks again and keep up the good work!

        Reply
    • Dennis
      Dennis says:

      To second Dakota’s comments, the smaller Sprinter is easier to maneuver, easier to park, and can snake its way into places that a longer vehicle would not. The simple-systems approach cannot be emphasized enough – include the stuff that is required for the missions you undertake, leave off the rest. Fewer things to fail, and a lighter, simpler machine.

      We came to the camper from our experience as backpackers and climbers. We ended up with a Sprinter very similar to Dakota/Chelsea’s. I’ve never seen a commercial build with the features of our home-made Sprinter. I’m sure some exist, but they must not be common.

      Reply
      • Austin Samuel Aho Adesso
        Austin Samuel Aho Adesso says:

        Thanks for sharing your thoughts, Dennis. I love the simple systems approach. Life is complicated enough as it is! And, solar, spare batteries, and space management is no easy task as it is…

        I could live very simply. HOWEVER, two of the big considerations are: 1 – what will keep my wife happy. She is an outdoor person, big runner, yoga, etc. but a woman’s needs are different than a man’s. She will probably wash every day!?! and #2 is HUGE: I am a video editor, and will need to work out of the vehicle… I have loads of hard drives, need fast internet, and a place to work. I’m thinking if we go Sprinter, we will have a very simple van/lounge/office with a small Scamp to sleep in, or we will go with a bigger sprinter conversion that has enough room for an office… I HATE the feel of a larger conversion with all of it’s shiny inside parts and doodads, but the space/security/package might more sense for our needs…

        Reply
  61. Enda
    Enda says:

    Hello Chelsea and Dakota from Ireland via Cambridge, UK.

    You guys have no idea how much this site has helped me building out my van both in inspiration and in practical tips. Thanks so much…. I have one super easy question. What size awning did you guys install, Fiamma F65 320 or 290cm?

    Enda

    Reply
    • Dakota
      Dakota says:

      Howdy Enda! Glad you found our site helpful. As for awning length, I installed the 10’6″ version, or ~266.7cm if my math is correct. Perhaps the awnings are different sizes now? I don’t think the 320 fits on a 144″ Sprinter, so definitely Google around to see what’s up! Good luck.

      Reply
  62. Forrest
    Forrest says:

    Hey Dakota, great build! Thanks for documenting it. I’m curious — where do you keep your clothing? Is it in the door counter/storage area? Cheers.

    Reply
    • Dakota
      Dakota says:

      Yo! You’ve got it – we have two drawers each in the slider door cabinet, plus jackets up on the shelf over the front seats. Works well for us!

      Reply
      • Forrest
        Forrest says:

        Great. Thanks man. Purchased my Sprinter this morning and will be incorporating a number of your tips/suggestions.

        Reply
  63. Sarah
    Sarah says:

    Hi! Thanks for doing such a thorough review of your guys’ process and experience. I am just beginning the research for building/purchasing a camper van for my family’s use, and I’m trying to figure out what’s the best option for a four-person van. We won’t alway be using it with four people, but we’d like to have the option, and while the VW seems to be a good option for four-people, I’ve read too many horror stories of breaking down in the middle of nowhere.

    Long story short – any recommendations for customizing for four people? Thanks!!

    Reply
    • Dakota
      Dakota says:

      Hi Sarah! My recommendation is to check out either the Sprinter, Promaster, or Transit and setting up a modular bed/eating area at the back. (Benches on either side with the bed spanning it.) Keep any bikes outside and optimize the inside for comfort and usability. I’ve seen people do this with the 144″ Sprinter or equivalent Dodge/Ford van, but the 170″ will give you 4 more feet to use and changes things dramatically. If the van is a daily driver, I wouldn’t go with a longer wheel base, but for a camper, could be a good option. Have fun!

      Reply
  64. ferhat tas
    ferhat tas says:

    Hi,

    My name’s Ferhat and i from Ankara, tha capital city of Turkey.

    We have a Mercedes Sprinter and we want to change it’s front seats to swivel seats.

    We’ll use this Sprinter for making the documentaries. So we use difficult roads…

    Unless it is extremely expensive, price is not a problem for us.

    We already have to bring the swivel mechanisms from abroad.

    When i searching in the google, found your pages about seats, so i registered this forum and sendingthis message..

    So, Wich companies that you would suggest me for swivel seats mechanism with no country or price limitations..

    Best Regards

    Ferhat Taş

    Reply
  65. amanda clements
    amanda clements says:

    Hi Dakota~
    We LOVE ya’ll site!! It’s been super helpful. We just bought a 4×4 Sprinter 144 high top. We had windows installed last weekend. And we’ve ordered a kit from Adventure Wagon for the inside build. I was wondering about your curtains. Did you have to use a industrial sewing machine? I’ve never used a sewing machine before, and I’m pretty clueless. But I love the idea of trying to make the magnet window covers. Thanks so much! #baddogbasecamp

    Reply
    • Dakota
      Dakota says:

      Congrats on the van! That was my first time using a sewing machine as well, and I simply used the cheapo one my wife had from years ago. Worked great!

      Reply
  66. Taco
    Taco says:

    Loving the rear door bike mount. Have you ever considered mounting the bikes from the door for storage mounted vertical without the front wheel on? Would take up heaps less floor space.

    Reply
    • Dakota
      Dakota says:

      Yes, I’ve definitely considered putting bikes on the outside. Many people do that. Let’s just say my bikes are too expensive to leave on the back of the van and there’s not a chance I would. I have many mountain biker friends who only keep their bikes inside the van. Part of the tradeoff…but mtb suuure is fun!

      Reply
      • Taco Otten
        Taco Otten says:

        Sorry, no I meant inside off the rear door. With the front wheel off and the seat down (many have dropper posts) it should fit vertical. That way you can load one bike per door.

        Reply
  67. Forrest
    Forrest says:

    How did you manage to attach the supports for the bed platform at a height of 39″? I’m measuring that as 9″ above the horizontal rib of the wall. Did you use angled aluminum to rest the platform on?

    Reply
    • Dakota
      Dakota says:

      I used the 2×4 you can see in pics plus support legs. Got lazy and kept my initial prototype bed! You could easily just attach the bed at either end at 39″ high with angled aluminum (many blog readers have done that). Good luck!

      Reply
  68. Jon Voorhies
    Jon Voorhies says:

    Hi Dakota and Chelsea—-Great information—-thank you both. My son is outfitting his MB Sprinter 2500—–and its coming along beautifully. I have been tasked with finding insurance for MB Sprinters with extensive DIY improvements like yours—-have you been able to find coverage for your van and the improvements and if so could you share that info?
    Thanks for any info you might have.
    Best Regards, Jon Voorhies

    Reply
    • Dakota
      Dakota says:

      Howdy Jon! I used Safeco for years and recently switched to Progressive. I’ve never had a claim related to the van, so I can’t speak beyond saying that both companies will insure a vehicle. Safeco is good because they’ll do it even if the address is a parents and someone is traveling long term; Progressive only insures vans for shorter stints and has to use a home address. Hope that helps.

      Reply
    • Dakota
      Dakota says:

      Howdy! Ya know, I probably wouldn’t buy an awning if I did it again. It’s so windy in the summer that it’s often unusable, so we have used it a lot more in the rain. I think it works well for some people though!

      Also, noticed the U Idaho email. Are you two from Moscow? I grew up there! Your last name looks like a guy ahead of me by a year in high school.

      Reply
      • Don and Linda
        Don and Linda says:

        Thanks, Dakota! Yes, we live in Moscow. You are likely referring to Ben or Michael, our sons. Our friend Jay, who knows your parents I think, completed his Sprinter build out last spring. After I saw Jay’s project, I was super motivated to get a Sprinter. So our Sprinter arrived on 15-August. We got a stone gray, 4WD, 2500, 144 inch wheelbase model. We have been on three trips so far. Really fun!! Now, I am focused on completing the build out.

        Reply
  69. Kathy Hipsher
    Kathy Hipsher says:

    You guys are awesome!! Thanks for all the amazing information you’ve put out there. We have been inspired by your build and upgrades to incorporate many of them into our conversion. Small detail question…We are designing our build right now (a 144 low roof) and I’ve researched a bunch, but no one I’ve seen has ever commented or shown their set-up for dealing with trash/recycling. Do you guys have a dedicated spot? Any thoughts, ideas, suggestions for it? Thank you!

    Reply
    • Dakota
      Dakota says:

      Hey Kathy! We just burn our trash in parking lots of nice restaurants and glare at anyone questioning us. Juuust kidding. We had a spot behind the driver’s seat for that, but I honestly don’t think there’s a perfect way to handle it unless you give up valuable cabinet space. Good luck and happy trails.

      Reply
  70. Lee
    Lee says:

    Hi there, I love the van conversion. I really like the nice simple approach you took to the platform bed. Roughy what thickness is the plywood platform, and did you attach the reinforcing to the walls or is it only attached to the plywood platform? Thanks

    Reply
    • Dakota
      Dakota says:

      Hey Lee, I think the platform approach I took using wood is as cheap and simple as it gets. I used 3/4″ plywood (there’s details in the post with reinforcement info). The bed is attached at both sides to the wall of the van. Happy van building.

      Reply
    • Dennis
      Dennis says:

      We did the same: 3/4″ birch plywood held together by aluminum alloy C-channel (1″). We installed a support rail on each side, held to the van’s sides by Plus Nuts. The platform is supported additionally by a plywood interior wall at its front, and by a swing-away support leg at the rear. Works well – minimal flexing, very comfortable.

      Reply
  71. Mike
    Mike says:

    Did you add lock outs to your drawer slides? If not, do you wish you had them? Also, how well does the soft close and soft extension (dampers) work on your drawer slides? Thanks!

    Reply
  72. Tori
    Tori says:

    Sick build!

    Which bike repair stand did you use? I love the idea of having a stand door mounted for easy maintenance use but am struggling to find one online that can for sure support the weight of a trail bike and not just a 20 lb road bike. Any thoughts are appreciated. Thanks!

    Reply
  73. Gooddogmandy
    Gooddogmandy says:

    Just started reading through the wealth of information (and entertainment) that is your website. Pls excuse this query if you’ve addressed it elsewhere, but in the write-up above, you make mention of not staying in RV parks and being “afraid of them.” Assume that was a bit of sarcasm, but if not, is there an issue with RV parks? My only experience with them was in my youth on family vacas and they were okay then. Has the environment changed?
    Thanks, and really am enjoying your site!

    Reply
    • Dakota
      Dakota says:

      Howdy! That is def sarcasm, especially since I’ve never stayed in an RV park. However, they’re a) expensive b) never scenic and usually by a highway and c) you can take a Sprinter van to sooo many cooler places than an RV, so why stay in an RV park? In a pinch, sure, why not, but in general I’d wager you’ll be self-sufficient enough in a Sprinter to free camp somewhere without needing the RV park. ALL my opinion, of course – do what makes you happy!

      Reply

Trackbacks & Pingbacks

  1. […] the van.  This is where the sliding tray comes to the rescue.  I first saw this solution on the Traipsing About site before we even owned the van.  Later, I saw a nice detailed post on the Far Out Ride site that […]

  2. […] Traipsing About – another Sprinter Van. Interesting slide out bike storage. […]

  3. […] looked around and found that Traipsing About’s design was exactly what we were looking for! Here is our adaptation of the slide-out bike rack to our […]

  4. 7 Steps To A More Adventurous Life: Advice From A Traveling Nomad – Infoshare247.com says:

    […] years ago, the idea of building out a DIY camper van, renting out our house, and hitting the road for four months was intimidating. Now that we […]

  5. […] Traipsing About’s DIY Sprinter with ample bike storage […]

  6. […]  There are two professional custom builders in town.  For DIY and van life inspiration Traipsing About blog is definitely a great read maintained by  a couple from Portland who travels and lives out […]

  7. […] ultane is online now   Quote post #3 of 3 Old Today, 08:59:AM orton Senior Member   Join Date: Jan 2014 Location: Occidental, Ca. Posts: 832 Mentioned: 0 Post(s) Tagged: 0 Thread(s) Quoted: 253 Post(s) You could look for heavy duty slides than bolt to the floor. Traipsing About | The Adventure Mobile ? Our Sprinter Camper Van DIY Bike Hauler […]

  8. […] It would be mechanically reliable, more fuel efficient, and we could build it out ourselves like these folks did. A plus of these modern vans is that it would be easier to park — and sleep — in more […]

  9. […] going on a road trip! Our house is rented out, our van build-out is done (the neighbors are still rejoicing), and the wireless hotspot for my work needs is blinking […]

  10. […] so the fridge is losing points fast! (For more background on our full build-out, check out the adventure mobile […]

Leave a Reply

Want to join the discussion?
Feel free to contribute!

Leave a Reply

Your email address will not be published. Required fields are marked *

CommentLuv badge